Create 3D Game Models for Free: Opus 5.5 + Blender + Tripo (15 Steps)
文章目录
部分视频或图片暂未收录,已在正文保留提示;需要时可查看原文。查看原文 ↗
The people telling you 3D is hard are the same people selling you the course. I made it free.
You can make game-ready 3D models in Blender, which is free, with Opus writing the code. Props cost nothing per model: Opus writes Python and Blender builds them. Characters cost nothing on your own GPU, or about $0.20 to $0.60 per model on Tripo. Everything after the mesh (cleanup, rig, weights, clips, export) runs free in Blender.
This guide also answers the two questions I get most: why low-poly props from an AI sheet come out as floating boxes, and why clothes stretch when a Tripo character moves.
Concept sheet to rigged, animated character in a boat game, every stage replayed from the real files.
The short version:
-
Free: props, buildings and vehicles in Python in Blender (steps 02 to 05)
-
Free on your own card, or under $1 on Tripo: characters and creatures (steps 06 to 08)
-
Free for every model: rig, weights, clips and export in Blender (steps 09 to 15)
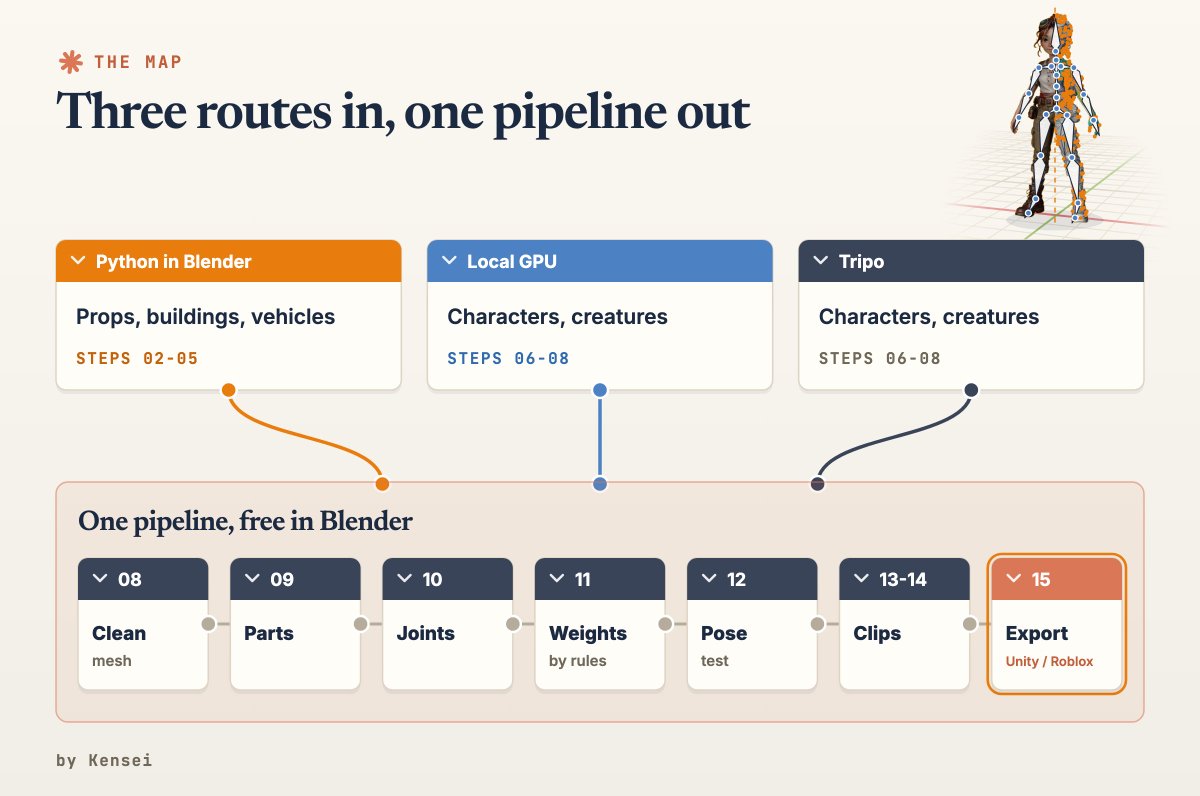
Three routes in, one rig and export pipeline out.
Set up once:
-
Install Blender (free) and Claude Code. Run every prompt below in Claude Code in the terminal, in one project folder. It writes the Python, runs Blender with no window and opens its own renders.
-
Tell Claude where Blender is. On a Mac it's /Applications/Blender.app/Contents/MacOS/Blender. Put that path in CLAUDE.md with this line: "Run Blender as: blender -b file.blend --python script.py".
-
Keep every step as a .py file, so you can rerun it after any change.
Words you'll see:
-
Mesh: the 3D shape, made of triangles. GLB and FBX: the files it's saved in.
-
Orthographic view: a flat view with no perspective, like a blueprint.
-
UV and texture: the picture wrapped on the mesh. Normal map: a texture that fakes small detail.
-
Decimate: cut the triangle count.
-
Armature (rig): the skeleton. Weights: how much each bone moves each vertex.
-
Rest pose: the pose the skeleton is built in. A-pose: arms down at about 45 degrees.
-
IK: the foot or hand stays put and the leg or arm bends to reach it.
PART 1 · PICK THE ROUTE
01. Pick the route by the object
Use code for anything you could measure with a ruler and a generator for anything you'd have to sculpt.
Free routes (no fee per model; you still need your Claude plan, and a graphics card for the second one):
-
Python in Blender: guns, crates, houses, whole city blocks, vehicles, furniture. You get exact sizes, a low triangle count and parts you can edit by number. Opus is weak at copying an organic shape from a picture: a character built from code comes out as a toy robot.
-
Local GPU: Hunyuan3D 2.0 makes shape plus texture from your sheet in a few minutes per model. The official figure is 16 GB of video memory for shape and texture; a portable build runs on an 8 GB laptop card, with softer faces, hands fused to whatever they hold and a 40,000-face cap. Its licence excludes the EU, the UK and South Korea.
Paid route, minimum price:
-
Tripo API: 1 credit = $0.01. A multiview model costs 20 to 30 credits as bare geometry, plus 10 to 30 for texture. With the detailed texture expect about 60 credits ($0.60). Failed and cancelled tasks aren't charged.
-
Pay only for the generation. Tripo also sells retopology (10 to 40 credits) and auto-rig (25 credits); steps 08 to 12 do both in Blender for free.
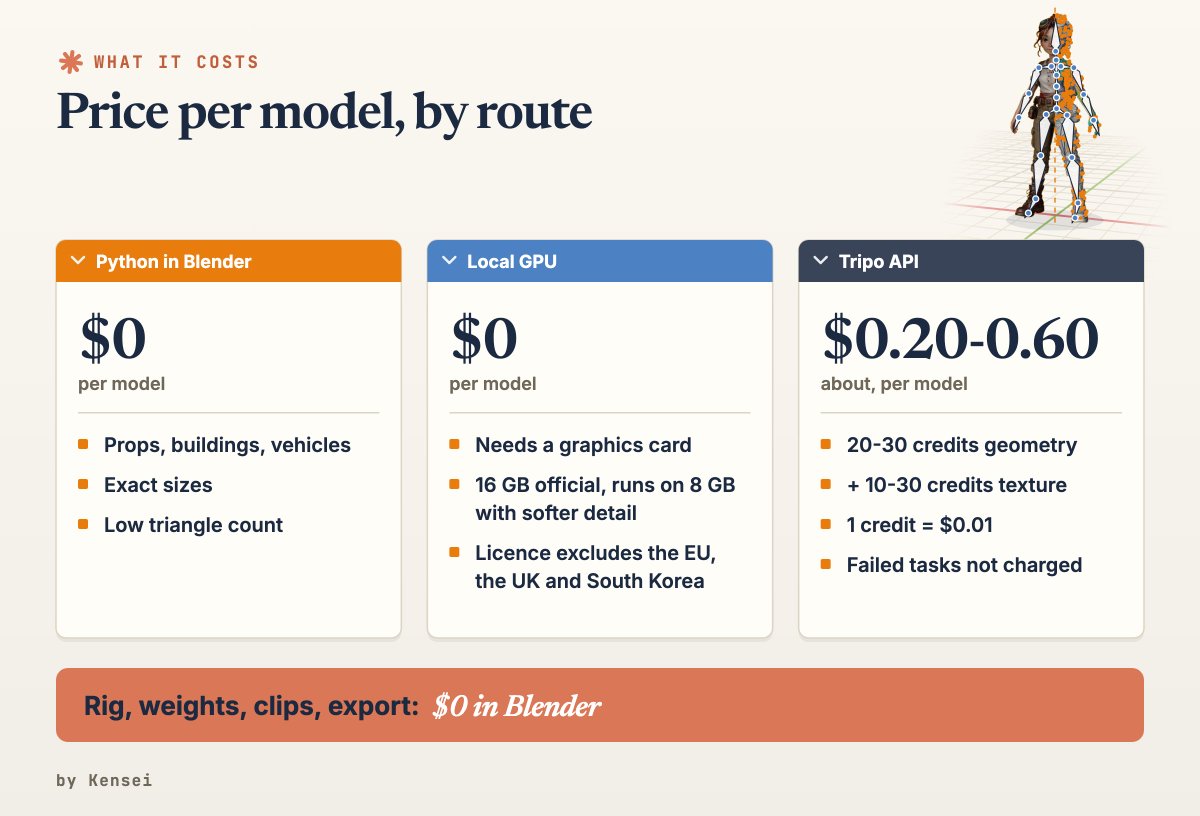
What each route costs per model, and what you get for it.
The same character sheet: 8 GB laptop GPU on the left, Tripo on the right.
PART 2 · LOW-POLY PROPS IN PURE CODE
02. Make a reference you can measure
A typical AI sheet shows the prop in perspective, with shadows, and the views disagree: a bipod folded in the side view and open in the 3D view. Claude can look at that image, but it can't measure it, so it guesses coordinates and the parts float.
Ask ChatGPT, or any image generator, for views made for measuring:
Orthographic side view of [object], exactly side-on, no perspective.
Plain white background, flat colours, no shadows, no reflections.
Same scale as the front and top views. Nothing cut off at the edges.
Ask for flat orthographic views, because a perspective sheet can't be measured and every guessed number becomes a gap.
If you have only one image with several views on it, ask Claude to cut it into separate views first. If a view is missing, give that size by hand (for example, the stock is 5 cm wide).
03. Write the numbers before any geometry
Read side.png and front.png. Before modelling anything, write parts.json:
every part of the [rifle] with its start and end along the length in cm
(from the back end), its height, width, colour and which part it attaches to.
Show me the list and wait for my OK.
Check the list yourself: a wrong number here costs one line, after modelling a rebuild.
04. Fix the rules, then build one part per prompt
Put the rules that never change in CLAUDE.md, so you don't repeat them in every prompt:
# Props rules
- Units: metres. Origin at the base centre. Forward is -Y.
- Budget: [2,000] triangles for the whole prop.
- Max 3 materials, flat colours, no image textures.
- Bevel hard edges 2 mm, 1 segment. Apply all modifiers before export.
- Renders: 768 px, orthographic, the same view as the reference, side by side with it.
- Max 3 fix rounds per part, then stop and show me.
Then one part per prompt, each in a fresh session:
Build part "stock" from parts.json with bmesh in a Blender script.
For its outline: threshold side.png, trace the contour, simplify to about 30 points,
extrude to its width, bevel. Render next to the reference and list the differences
in cm. Fix and rerender, max 3 rounds.
Build one part per prompt in a fresh session, because a whole-prop brief re-renders everything on every fix and the renders pile up in the context.
Use Sonnet for simple parts (barrels, boxes, planks) and Opus for outlines and joints.
05. Check the assembly, then export
Load all parts. For every part print the gap to the part it attaches to
(must be 0, no floating parts), the total triangle count and the bounding size
against parts.json. Render front, side and 3/4 views and open them.
Export FBX and GLB with modifiers applied.
For buildings and whole streets, ask for a generator instead of single models:
Write buildings.py: one function per building type (house, shop, tower) with
width, depth, floors, roof type and colour as parameters, windows and a door
placed by rule, flat colours. Build 10 variants from different seeds,
export each as GLB, render them in a row and open it.
Don't send buildings and street props to an image-to-3D generator. It returns almost square footprints, so a bus or a fence stretched to its real length goes flat, and the textures come out noisy instead of clean.
Props built in Blender by Python from a reference sheet, no generator.
A game city where every building comes from a Python generator script.
PART 3 · CHARACTERS FROM A GENERATOR
06. Draw the sheet for the generator
Character turnaround sheet: front, right side, back. Orthographic, same height,
A-pose, arms away from the body, legs apart. Empty hands: no weapon, no lantern,
no bag in hand. Light grey background, flat even light, no shadows.
Name the colour of every piece of clothing.
Draw the character with empty hands, because anything in a hand melts into it and you can't cut it out again. Make the props on their own sheet.
Image tools often draw the left view as a mirror of the right, so a strap or weapon jumps sides. Send only true views.
07. Put every view in its slot
Ask Claude to cut the sheet into view_front.png, view_right.png and view_back.png, one view per file, same height.
Tripo needs an API key from its developer platform and some credits. Put the key in an environment variable and ask Claude to write a small client from Tripo's API docs: upload the images, start a multiview task, poll it, download the GLB.
Tripo's multiview API takes up to 4 images as front, left, back and right. Front is required, 2 views are the minimum.
Put each view in the slot of the side it shows, because a side view in the wrong slot can give the character a second face on the back of the head.
Send view_front.png, view_right.png and view_back.png to Tripo multiview,
each in its own slot, left slot empty. Texture and PBR on.
When the model is ready, render it from the front and from the back
and tell me on which render the face is.
Local GPU instead of Tripo (Windows with an NVIDIA card): run Hunyuan3D-2-WinPortable (search GitHub for that name), which starts a local server on port 8080. Ask Claude to send the same views to that server in multiview mode with texture on and save the GLB. On an 8 GB laptop card that took about 4 minutes per model.
To spend less: check the views before you send them (a wrong view is a paid redo), and skip texture for background characters you'll paint flat in the engine.
A working client script and request body are in the earlier guide:
08. Clean the mesh before any bone
Clean model.glb with a Blender script:
1. Turn it to face the engine's forward axis, feet on 0, height [1.15] m, apply transforms.
2. Merge vertices by distance and print the count of loose parts.
3. Recalculate normals; list flipped faces, holes and zero-length normals.
4. Decimate a copy to [budget] triangles, keep its UVs, and bake the base colour
   and a normal map from the original onto it.
5. Render front, side and back with a 5 cm grid and open them.
Budget: up to 20,000 triangles for Roblox (its limit per mesh), 40,000 to 70,000 for a Unity hero, 3,000 for crowds. Tripo GLBs come in facing +X.
Merge vertices before weighting (line 2), because duplicated seam vertices get different weights and tear open in motion.
Make the 3,000-triangle crowd copy too: a crowd of full 40,000-triangle models drops the frame rate hard.
Characters made free on an 8 GB laptop GPU: about 40,000 triangles each, 23 bones, then the same walk on the 3,000-triangle crowd copy.
Two characters from Tripo multiview after cleanup, playing their clips in Unity.
PART 4 · RIGGING WITHOUT STRETCHED CLOTHES
A generator hands you one fused shell: the coat is welded to the legs, the sleeves to the hands. Automatic weights can't tell clothes from body, so a raised arm pulls the coat and the chest with it. Steps 09 to 12 fix that.
One character from sheet to rig: views, generation, split into parts, bones, clips.
09. Split the shell into parts
Tag every face as one part: head, torso, arm L/R, hand L/R, leg L/R, [coat, scarf, belt].
Use the texture colour and the position on the body.
Where two parts only touch (hand on coat, coat on leg), split the edge.
Render one flat colour per part, front and back, and open it.
Tag by position as well as colour, because a dark coat patch tagged as scarf follows the scarf and leaves a hole in the back.
10. Read the joints off a grid
Render the model orthographic, front and side, 5 cm grid, labelled axes.
Write hips, spine, chest, neck, head, shoulders, elbows, wrists, knees, ankles
and toes to joints.json in metres. Draw them as dots on the renders and open them.
Check the dots before any bone: a shoulder joint 3 cm too high stretches the whole sleeve. Use Mixamo bone names (Hips, Spine, LeftArm...) and Unity's Humanoid importer maps the rig by itself. Animals take the same steps with their own joints (spine, tail, four legs) and import as Generic.
11. Set weights by rules
Build the armature on joints.json. Long cloth below the hips gets 2 bones of its own,
front and back, children of Hips. Bind with automatic weights, then fix in code:
- torso and [collar, scarf, coat] get 0 on every arm bone
- the head bone moves only head and hair
- each hand is 100% on its hand bone, the head 100% on Head
- belt, pouches and sash go 100% on Hips
- the coat skirt goes on the cloth bones
- max 4 bones per vertex, then normalize
Save it as a script you can rerun after every change.
If automatic weights fail on a generated mesh with holes, bind a voxel-remeshed copy of it instead, then transfer the weights back to the real mesh.
Never smooth weights across two tagged parts, because smoothing leaks the hand bone into the coat and pulls a spike out of it. Smooth only around shoulders, elbows and knees, inside one part.
Same mesh, same bones. Arms up 90: the longest stretched edge drops from 40x to 16x with the rules.
Use the rules when the clothes follow the arms. They also made the head turn and the step worse on this model: the collar, weighted to the chest, touches the head, and the hip weight runs down the thighs. Run step 12 and fix those seams vertex by vertex.
12. Test poses and measure the tears
Pose test: arms up 90 degrees, arms forward 60, a step with each leg, head turned 60.
Render each pose front and side. For each pose print the longest stretched edge
against the rest pose and the 10 worst vertices with their bone.
Fix the weights there and rerun. Max 3 rounds, then show me what's left.
Keep shoulder turns near the rest pose, because a generated mesh has no spare geometry in the armpit and big turns tear the upper arm.
PART 5 · CLIPS AND THE ENGINE
13. Write clips on one rest pose
Store the rest pose of this armature; every clip starts from it.
Limits: knees and elbows bend one way, wrists max 60 degrees,
spine max 30 degrees per bone, head max 70 left and right.
Write idle.py (2 s loop, breathing, small weight shift) and walk.py
(exactly two footsteps, 1 s, loop), 30 fps. Feet planted with IK while
on the ground, hips bob 2 cm. The last frame must match the first.
Render a frame sheet of each and open it.
For a combat clip, the same pattern:
Same rest pose and limits. Write attack_1.py, 0.8 s. Sword is a child of the
right hand bone, shield of the left forearm. Key poses as joint angles: guard,
wind-up, strike, follow-through, guard. Feet locked with IK. Render the key poses
front and side and wait for my OK before adding in-betweens.
Write clips on the armature they will play on, because a clip copied onto a rig with a different rest pose breaks the legs.
14. Check every clip by numbers
For every clip print: foot slide while the foot is planted (cm), the lowest vertex
(must stay above the floor), the hips height range and the difference between
the first and last frame of loops. Render a frame sheet per clip. Mark every failure.
A pose that looks wrong still needs your eyes.
A Tripo character after cleanup, rig and clips written as code, riding through a game city.
15. Export for your engine
Export character.fbx: mesh, armature and all clips. Apply Transform off,
Add Leaf Bones off, scale 1. Import it back into an empty scene, play every clip
and print the bone count, triangle count and height.
Leave Apply Transform off for rigged meshes, because Blender's own docs mark it as broken with armatures. Step 08 already applied the transforms.
In Unity:
-
Humanoid for two arms, two legs and a head; Generic for animals, with a root bone you name.
-
Set Loop Time on import; the FBX doesn't carry it.
In Roblox:
-
File, then Import 3D. Rig type Custom for your own skeleton.
-
Keep Zero Influence Bones on if you have helper bones, like weapon sockets. It's off by default.
-
Bones need scale 1 and rotation 0, the root at 0,0,0 and no skin weight on Root. Max 4 bones per vertex.
-
1024 px textures are the safe size; normal maps are OpenGL.
-
Put a small probe cube in the file and measure it after import: the importer can change the scale of the whole file.
When it breaks
-
Prop parts float: the sheet was in perspective. Steps 02 and 03.
-
Session limit hit on one prop: one part per prompt, 768 px renders. Step 04.
-
Second face on the back of the head: a view in the wrong slot. Step 07.
-
Extra tail or limb: the generator saw only the front. Send the back view.
-
Prop melted into the hand: empty hands on the sheet. Step 06.
-
Clothes stretch with the arms: torso and coat weighted to arm bones. Step 11.
-
Spike out of the coat: weights smoothed across parts. Step 11.
-
Head or hips tear when turning: a rigid part meets another bone's weights at the seam. Step 12.
-
Twisted knees in a clip: the clip came from a different rest pose. Step 13.
-
Boots point backwards: turn the foot 180 degrees about the shin before rigging.
-
White discs or black triangles: faces with a zero-length normal. Step 08.
-
Thin wires, text and logos missing: generators drop them. Build those parts in code.
What this run took
The girl in the video: one Tripo multiview generation for $0.60, 40,000 faces, 24 bones plus 2 cloth bones, 5 clips written as code, rowing in Unity with hand IK on the oars. The city characters in video 8 cost nothing: 15 models on an 8 GB laptop GPU, 40,000 triangles each plus a 3,000-triangle crowd copy, because 238 full models on screen ran at 9 fps. The combat clip in step 13 is a pattern, not a clip from these builds.
Which route fits your game: free from code, free on your GPU, or under $1 on Tripo?
沿着这个主题继续读
从一篇文章,找到相关的教程、经验和阅读路径。