How I Turn One Image Into a 3D Simulator That Takes Itself Apart
文章目录
部分视频或图片暂未收录,已在正文保留提示;需要时可查看原文。查看原文 ↗
I gave Claude a job description instead of a prompt. Now one picture becomes a 3D build in code that Claude checks against the picture and films taking itself apart. Below: the brief, the checklist and every prompt.
Theraphos TH-8: runs in and lands from a jump, the glass abdomen opens on its glowing coils, the whole spider explodes and snaps back together, then it jumps at the camera
The first time I asked Claude for a robot animal with nothing to work from, I got a generic toy.
This tarantula came out of the same model. What changed is the input: one picture from ChatGPT, and a job description instead of a prompt.
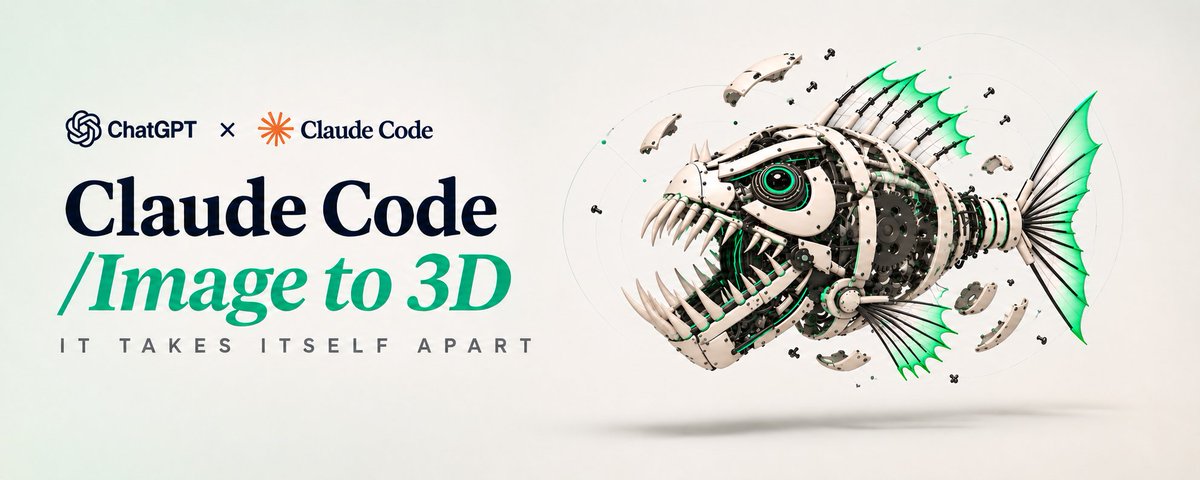
Serrasal PX-7: swims in with its jaws open, the lower jaw drops toward the camera with its glass fangs, the whole fish explodes while the camera circles it, then it lunges at the lens
The piranha has 2 rows of glass fangs, a glass flank over its drive gears, a tail stalk that telescopes and an eye under an angry brow. Every part is a button. Press one and that part comes apart.
Every animal here started as one picture from ChatGPT. Claude rebuilt it in three.js. There is no 3D model and no download: every shell, gear and fang is written as code.
Animals are just what I tried first. The same file works on anything with a dense mechanical core: an engine, a drone, a camera, a watch.
I started 9 animals this week. 5 shipped. A moth, a scarab, a fly and a hydra didn't.
What made the 5 work was a file. I stopped writing prompts and wrote Claude a job description: what the build should look like, where the camera goes, what to check before I see anything, and one rule above all of them. Nothing gets filmed until I say yes.
At the end I'm giving the whole thing away as a free Claude Code skill: the job description, the checklist, every prompt, and 3 of these animals as code you can build and take apart yourself.
What You're Building
Every build goes through the same 6 pieces:
-
The reference. One image from ChatGPT. It sets the look and nothing else.
-
The job description. One file Claude reads before every build.
-
The checklist. 10 to 12 numbered lines on what this one picture stands on. A new list for every picture.
-
The still. One frame posed like the reference, graded line by line, at least 3 rounds.
-
The page. The object in the middle, a title, one button per part, live cards around it.
-
The film. About 21 seconds: a part comes apart every 2 to 3 seconds, a full explode, an exit. Then a 10-second version for posting, with its own script.
What You Need
-
Claude Code on Opus 5.5.
-
ChatGPT for the reference image.
-
Node.js 20 or newer, plus ffmpeg and Python 3 for the video and the sound. Claude Code installs them if you ask.
Step 1. Generate the Reference
A robotic [hammerhead shark] as a precision machine, studio product shot on a near-white background with a soft floor shadow. White glossy shells with clearcoat, green only on tips, rims, edges and joint rings. Dense dark mechanism showing through cut-outs and clear glass: gears, pistons, hoses, small screws. Eyes as glossy black lenses with a thin green ring. Fins and membranes milky and frosted with thin veins. Front three-quarter view, the whole subject in frame.
The picture is a target for the look. Claude never imports it: it reads it and builds its own. Swap the subject for anything: [a motorcycle engine], [a camera drone] and [a mechanical watch] run through the same prompt.
Pick a subject with lots of joints and a dense core. Smooth surfaces lose: a long white shell reads as a toy however many rounds it gets.
If it's a creature, give it one main set of limbs: tentacles, legs or wings. I cut a flying octopus and a scorpion-squid before I made their pictures. Wings and tentacles fighting for the same half second is noise.
Step 2. Write the Job Description
Save this as a file in the project and point Claude at it before every build.
You build robotic objects and creatures from a reference image, in three.js, entirely in code.

The look:
- white shells with clearcoat and an environment map
- green as a sparse accent only: tips, rims, edge lines, a bezel, joint rings; never dots sprinkled over a shell
- dark mechanism in 2 levels: big parts (gears, rings, actuators) and about 260 small ones (pistons, hoses, screws, wiring); cut windows into the shells so the dark mass shows
- eyes as glossy black lenses with a thin green bezel and a small pupil
- membranes milky and frosted with thin veins
- every limb has its own pose and segment lengths, never a row of identical parts
- bristles and spikes thin and short: 0.15 to 0.25 of the limb's thickness
- one main set of limbs per creature
- near-white studio, soft floor shadow

The order:
1. Measure the reference first: its main proportions (height, head, jaw or limb length) as shares of its length.
2. Build the object and render one still posed like the reference.
3. Put the reference, your still and an approved still side by side and grade every line of the checklist: yes, partial or no. Grade against the picture, not against what you remember building.
4. Grade one more line every round: at thumbnail size, does it look as dense as the approved still?
5. Measure it: the share of dark pixels in the object's frame, yours against the reference's. Below 0.8 of it is a no.
6. Stop after round 2 and show me. The film waits for my yes.

The camera:
- frame 0 is the front 3/4 hero view, the object big and already moving
- every teardown gets its own side, height and distance, aimed at the part itself, pushing in while it hangs open: an eye in macro, a tail from behind, a back from above, a jaw from below
- the part being opened stays in view; the rest of the object may run off the frame
- smooth paths only: the camera never copies a wing beat or a footstep
- visible wing beats stay slow, 1.5 to 2.5 Hz

When I correct you, the correction goes into this file.
3 lines carry the weight. "Grade against the picture" is how the self-check stays honest. "The film waits for my yes" means no tokens burn on a film of a toy. "The correction goes into this file" is how build 5 stops repeating the mistakes of build 1.
Step 3. Write a Checklist for This Picture
The job description covers every build. The checklist covers one picture. Write it before the first line of code: what does this picture stand on, in numbered lines a reader could check?
My tarantula, 4 of its 12 lines:
1. A heavy spider low on 8 thick legs spread wide, head toward the camera, the big abdomen rising behind and above the head. Front 3/4 from slightly above.
2. Two large curved fangs under the head, dark with glowing green tips, the brightest accents at the front of the frame.
5. The abdomen is a white frame of curved bands holding panes of CLEAR glass, with green coils glowing through. Never a solid white shell.
7. Thin black spike rods all along the legs, 10 to 20 per segment, pointing outward. They read as hair at thumbnail size.
Line 5 has the word "never" in it on purpose. Without it the glass turns into one more white shell, because a white shell is the default.
Line 7 is the one I'd write differently. It says thin and never says how thin. The bristles came back as quills, twice the length they should be. The fix is a number: 0.15 to 0.25 of the leg's thickness. Every fix since has been a sentence with a number in it.
Step 4. Run the Still Loop, Then Grade It Yourself
Read the job description and this checklist. Build the [tarantula] and loop:
1. Render a still at 1600×900 posed like the reference.
2. Stack the reference, your still and the approved still side by side, plus a thumbnail of the same stack 900 px wide.
3. Grade every checklist line yes, partial or no, one line each.
4. Fix the no's, then the partials.
Stop after round 2 and show me the stack and the grades. Wait for my notes before round 3.
Then do your own grading, against the picture and not against your memory of it.
That cuts both ways. On the fly I read the eyes as too busy and asked for smaller lenses. The head came back as a disco ball. The reference had big ones; I'd misread it.
Step 5. Measure It, Don't Eyeball It
A moth, a hydra and a fly all graded themselves dense enough, and all 3 read as clean white diagrams. I threw the moth out after 9 rounds.
The checklist checks features: the eyes, the mouth, the silhouette. It never checks how much machine you can see. So now Claude counts it:
Crop the reference and your still to the object's bounding box. Count the share of dark pixels (luma under 80). Your share has to reach 0.8 of the reference's. Raise it by breaking white surfaces into separate plates with gaps over the mechanism. Adding dots doesn't count.
The hydra measured 0.57 of its reference. One round aimed at the number took it to 0.80. The fly reached 0.96 once its plates got real gaps.
Proportions get the same treatment. The piranha's round 2 passed on density and still came back as a crocodile: jaws at 0.52 of the body length, where the picture's sit at 0.37. Round 3 got 4 numbers measured off the picture: body height 0.55 of the length, head 0.44, jaws 0.36, a gape as tall as the jaw is long. It landed at 0.35.
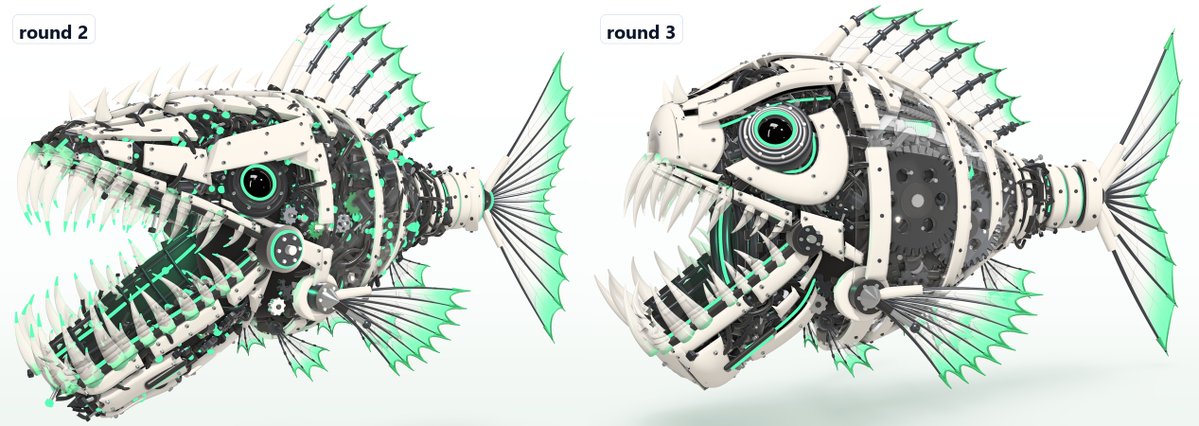
the piranha in round 2 and round 3: jaws at 0.52 of the body length, then 0.35
Step 6. Save Every Correction
My notes from this batch. Every one went into the job description:
-
The tarantula's bristles read as quills. Bristles now have a thickness in numbers.
-
A rule to keep the whole octopus in frame pulled the camera back to a flat view from above and curled the arms in. Now only the part being opened has to stay in view.
-
The moth read as a diagram. Density now gets measured, not graded.
-
The piranha read as a crocodile. Proportions now get measured off the picture before the first line of code.
-
A flying octopus and a scorpion-squid had 2 sets of limbs each. One main set per creature now.
-
The camera parked. In the piranha's first film every teardown sat between 20° and 50° on the same side, at the same height and distance. Every beat now gets its own side, aimed at its own part.
The file grows by one line per mistake. The next build starts with all of them.
Step 7. Film It From One Approved Choreography
Take the approved film of the build whose body is closest to this one and port it 1:1: the same beat times, the same moves, distances scaled to the object. Change the body only.
Map its 5 parts onto the 5 slots: [the eye, the hammer, the flank, the jaw, the pectoral fin].
Each part opens in about 1 s, holds with its parts still spinning, and closes in 0.5 s. Give every part its own camera: its own side and height, aimed at the part, pushing in while it hangs open.
Then a full explode on a 330° turntable, a fast reassembly while it turns, and an exit.
Build a page around it: an invented product name and title, one pill button per part that a cursor clicks, live cards that move with the parts.
Before you show me the film, put its frames at 1.5, 4.5 and 12.4 s next to the approved film's. If it looks smaller, flatter or blurrier, it doesn't ship.
My first glass octopus film got another animal's choreography plus a rule of my own: keep the whole octopus in frame. It came back far away, flat, arms tucked in. A toy.
Hyalos GX-8: jets in, the glass head lifts off and turns over, the whole octopus explodes on a turntable, then it jets away
The second one got an earlier octopus film 1:1 with only the head swapped. That's the one above. The piranha took an anglerfish's film the same way: the same deep body, the same jaw that drops off its hinge.
The scarab is the other half of the lesson. Nothing I'd built had a body like it, so it borrowed only a camera and built the body from zero. 4 rounds and about 450,000 tokens later it was still busy and cheap. Now a subject with no close body gets flagged before it starts.
Step 8. Cut What's Boring, Then Write the Short Version
The whole film is one file:
{"duration": 21.2, "script": [
  {"t": 3.0, "act": "optics"},
  {"t": 5.7, "act": "hammer"},
  {"t": 8.2, "act": "flank"},
  {"t": 10.8, "act": "jaw"},
  {"t": 13.3, "act": "exploded"},
  {"t": 16.5, "act": "assemble"},
  {"t": 17.7, "act": "hero"}]}
The hammerhead's fin came off crooked and the beat was dull, so I deleted 1 line. The film went from 24 seconds to 21.2. The object, the page and the sound all read the same script, so a new cut is one edited file and one render.
For posting I need 10 seconds. My first short versions were the full film trimmed to its busiest moments and crossfaded together. They jumped from fragment to fragment and looked cheap.
Now the short version is its own script: the opening, one part, the explode, the exit.
{"duration": 11.3, "film": 10.0, "script": [
  {"t": 2.7, "act": "abdomen"},
  {"t": 5.2, "act": "exploded"},
  {"t": 7.0, "act": "assemble"},
  {"t": 7.8, "act": "hero"},
  {"t": 9.6, "act": "jump"}]}
The tarantula's scene runs 11.3 seconds and plays back at 1.13x to land on 10. Every short film also gets its own opening and its own exit, so no two in a row look alike: the wasp dives in and climbs out of the top of the frame, the tarantula lands from a jump and jumps at the camera, the octopus jets away.
Vespion VX-9: dives in from above, a wing pulls out of its hinge and turns over in the air, the whole wasp explodes in slow motion, then it climbs straight out of the frame
Every video in this article is one of those: 10 seconds, one take.
Step 9. Render It
Render the film frame by frame: render(t) is a pure function of time. Capture at 1600×900 with a device pixel ratio of 2.4, downscale to 1920×1080 at 60 fps with lanczos, H.264, yuv420p, faststart.
Score it in code on the same script: a music bed for the whole film, a quiet click per button, a short accent on every part that moves. Master to -14 LUFS. For a short version played faster, score the scene's script and time-stretch the sound by the same factor.
A screen recorder drops frames when the GPU works hard. A seeked film can't. Rendered at 4K and brought down to 1080p, the thin veins on the fins stay sharp.
Bonus. Don't Run 4 at Once
Every build gets its own fresh agent with the job description, the reference and its checklist. One fresh agent costs less than one long chat, because the long chat carries everything before it into every call.
But more at once isn't faster. I ran the moth, the hydra, the fly and the octopus in parallel and read each one only after its 6th round. The moth alone ate about 430,000 tokens before I threw it out. A still costs about 400,000 tokens and a film another 150,000 to 400,000, so a late review is the expensive kind.
Now it's 2 at a time, and I look after round 2, while a note still changes the outcome.
The job description is above. Swap the picture.
Or skip the copying. The whole method is a free Claude Code skill: the job description, the checklist, every prompt, and the tarantula, the piranha and the wasp as code you can build, take apart and film. One command installs it:
npx skills add Nyxera0x/cutaway -g -a claude-code
Free skill on GitHub: https://github.com/Nyxera0x/cutaway